Evaluating the capabilities and limitations of device management solutions can be a challenge. Microsoft Intune is no exception. It has a number of tools available to manage mobile devices, PCs, and applications, which can be overwhelming when you try to understand the capabilities of each different service. This blog post will focus on the Windows Update capabilities for Windows PCs in Microsoft Intune, including selecting which updates are approved or declined, what updates are automatically approved, and controlling when updates need to be installed.
Managing Update Settings
The first place to go when starting to manage updates in Intune is the updates section under the Admin tab (see Figure 1). Here you set the Product Categories and Updates Classifications which Intune will check for updates. Note that this is just the gatekeeper controlling the updates that can be approved or declined later by an administrator or by an automatic approval rule. In other words if you don’t select a product or update classification you will never see those updates, but selecting just the updates you need will make sorting through updates easier. Make sure to click the Save button at the bottom of the page once you’re done.

Figure 1
After selecting what updates will be reviewed in Intune, go to the Updates tab. The Overview page (see Figure 2) gives you a quick overview of necessary maintenance tasks—for example, if available updates need approval. Each status box is also a clickable link.

Figure 2
The links will take you into the All Updates list with one of several filters applied. In Figure 2, the “3 Need additional approvals” warning is applied by the “Needing additional approvals” filter. You can also change the filter directly from the dropdown menu in the list view (see Figure 3).

Figure 3
From the list we can approve or decline each update individually or select multiple updates that need the same approval. Select the update to approve from the list, and then click on the Approve link above the list. Select and Add the group you want to deploy the update to. Finally, set the Approval dropdown to “Required Install” and the Deadline to your desired deadline. Note that “As soon as possible” will set the deadline to the previous midnight and will start a required install (including a forced restart if needed) the next time each endpoint checks in with Intune.

Figure 4
Automatic Updates
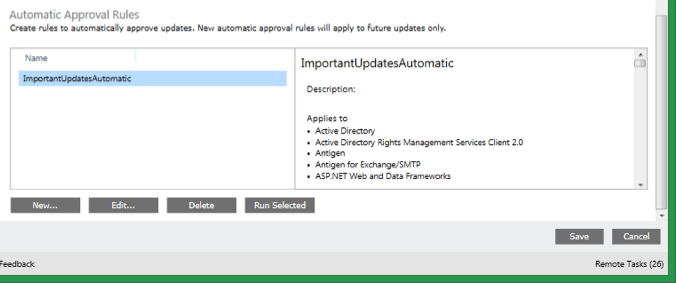
While you could individually review each update, Intune provides automatic approval rules, which can automatically approve updates for selected products and updates categories. Go back to the Admin tab, select Updates from the menu list, scroll down to the Automatic Approval Rules (Figure 5), and click the New button. Give your rule a name, and then select the Product Categories and Update Classifications that will be automatically approved.

Figure 5

Figure 6
The Timing of Updates
On the Deployment screen (Figure 7) select and add the groups that should receive the approved updates. At the bottom of the deployment screen you can control the deadline for computers to have the approved updates installed.
There are a couple points to note on this feature:
Setting the deadline does not control when updates will start trying to install. Updates that are approved by the rule will start to download and install at the first maintenance window or user interaction with the Intune client depending on your configuration polices, which we will look at below.
When a deadline is enforced, updates will be installed as soon as the deadline passes. If a restart is needed to complete the update process, Intune will force a restart without the option to restart later.
When finished on the deployment screen, click Next and then Finish to save the rule. After the rule is saved, use the Run Selected button to apply the rule to all currently available updates. Future updates will be automatic processed by the rules.

Figure 7
Update Settings
The final component of updates in Intune is set in the Policy tab, in the Configuration Policies with the “Microsoft Intune Agent Settings” template (Figure 8). In addition to updates, this template also controls endpoint protection, user-device linking, and network bandwidth settings. If you don’t already have an Intune Agent Settings Configuration Policy created, you can create one with the Add link. Open the Computer Management sub-menu and select “Microsoft Intune Agent Settings,” and then click Create Policy. I will just cover the Update settings here, but the other settings in the policy should be evaluated before deploying the policy to an active computers group.

Figure 8
Most of the update settings are self explanatory and hovering over the ‘i’ icon gives more in-depth details.
But it’s worth nothing that Intune separates updates into two types—Microsoft Intune client agent mandatory updates and all other updates and applications. The Microsoft Intune client agents are required for Intune to work properly with endpoints and they often require a restart to complete their installation. Because of this, Microsoft sets the default setting for “Prompt user to restart Windows during Microsoft Intune client mandatory updates” to “Yes,” which will force the user to restart without the option to restart later. Setting this to “No” means that Intune may not function correctly until the endpoint is restarted at the user’s discretion.

Figure 9
Stay Current on Device Management Solutions
That sums up every update component for Windows PCs in Microsoft Intune. Microsoft is constantly updating Intune to deliver new functionality including support for Windows 10 and the latest mobile device operating systems. Are you considering adopting a device management solution and need additional information or real world expertise? Credera has extensive experience in designing, planning, and implementing systems management solutions.
Contact Us
Let's talk!
We're ready to help turn your biggest challenges into your biggest advantages.
Searching for a new career?
View job openings