


In our previous blog post, we covered the basics of temporal tables, including a few use cases and examples of code to apply to those cases. This included functionality such as inserting or updating data and querying the historical data from different viewpoints. In the second part of our temporal table blog series, we’ll cover more advanced topics, such as correcting historical data, removing unwanted data, and patching system times.
Altering Temporal Tables and System Versioning Settings
By default, temporal tables do not allow developers to change data within the history tables. They are designed as such to maintain contiguous historical records and ensure compliance standards can be met. In the following sections, we’ll cover how to change data in history tables. This action can result in losing historical data and could be seen as a compliance risk without proper documentation.
The initial step needed to change historical data or table structure is to turn system versioning off for your table. This will effectively break the link between your current table and your history table. After disabling the temporality, you’ll be able to carry out any typical data changes on each of the tables independently. We recommend taking backups of your tables before doing any major alterations to data or structure.
ALTER TABLE dbo.Customer SET (SYSTEM_VERSIONING = OFF);
ALTER TABLE dbo.Customer SET (SYSTEM_VERSIONING = ON (HISTORY_TABLE = dbo.Customer_History));
Making Historical Records Active
In some situations, you may need to recover records that were accidentally deleted from your active table. In this example, a script was run unintentionally to delete all records for CustomerID 2 from the active Customer table.
DELETE FROM dbo.Customer Where CustomerID = 2
Our objective is to find the most recently deleted record for this Customer and move that record back into the active Customer table. For this use case, the records in the History table will not be affected to keep an accurate representation of the accidentally deleted data.
SELECT CustomerID, FirstName, LastName, Address, RowStart, RowEnd INTO #DeletedCustomerRecord FROM Customer FOR SYSTEM_TIME AS OF '2019-09-03 01:54:00' WHERE CustomerID = 2
INSERT INTO Customer (CustomerID, FirstName, LastName, Address) SELECT CustomerID, FirstName, LastName, Address FROM #DeletedCustomerRecord
Removing Historical Data
From time to time, incorrect data may be loaded into your temporal table that will need to retroactively be removed from history. This could be in the event of a defect in a data load, loading data from a test environment rather than production, or various other scenarios. In this scenario, our AccountBalance table has the following data, and we want to delete the records that came in on the yellow-highlighted timestamp.
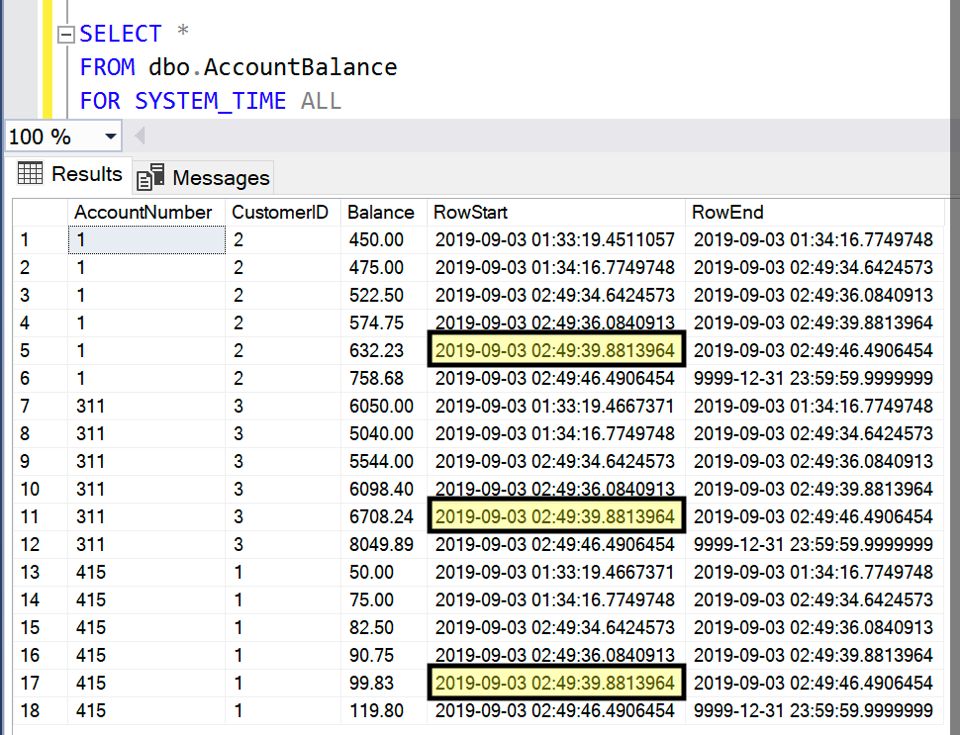

Figure 1 – specific records to be deleted highlighted
To accomplish this, we need to turn the system versioning on our AccountBalance table off temporarily to make the changes. After setting system versioning to off, our two tables, AccountBalance and AccountBalance_History, will act as independent tables that we can freely manipulate.
ALTER TABLE dbo.AccountBalance SET (SYSTEM_VERSIONING = OFF);
Next, we can delete those records as you would in a traditional table. We’ll do this by identifying the RowStart of the three records and deleting each of them.
DELETE FROM dbo.AccountBalance_History WHERE RowStart = '2019-09-03 02:49:39.8813964'
Now that the records are deleted, we have the option of reactivating the system versioning of the AccountBalance table to complete this task. Following the deletion of the three undesired records, the AccountBalance_History table has a gap of time in continuity in the RowStart and RowEnd columns. Typically, the RowEnd of one record is equal to the RowStart of the following record, but this is no longer the case in our AccountBalance_History due to the deleted records. The following code will show an example of how to correct that issue.
WITH AccountBalancesSequential AS ( SELECT AccountNumber, RowStart, RowEnd, ROW_NUMBER() OVER(Partition by AccountNumber Order by RowStart) as AccountNumberRanked FROM dbo.AccountBalance_History ) UPDATE AB SET AB.RowEnd = NextAccountBalance.RowStart FROM dbo.AccountBalance_History AB JOIN AccountBalancesSequential SEQ ON AB.AccountNumber = SEQ.AccountNumber and AB.RowStart = SEQ.RowStart JOIN AccountBalancesSequential NextAccountBalance ON NextAccountBalance.AccountNumber = SEQ.AccountNumber and NextAccountBalance.AccountNumberRanked = SEQ.AccountNumberRanked +1 WHERE SEQ.RowEnd <> NextAccountBalance.RowStart
At this point, all undesired records will be deleted, and system columns RowStart and RowEnd will appear as a continuous span of time in the AccountBalance_History table. Finally, the statement to reactivate system versioning on the AccountBalance table:
ALTER TABLE dbo.AccountBalance SET (SYSTEM_VERSIONING = ON (HISTORY_TABLE = dbo.AccountBalance_History));
Inserting Data
In some cases, you may need to insert historical data. This could happen if you miss data that should have been loaded at a certain point in history. Due to the nature of temporal tables, loading missing data normally requires truncating the tables and reloading. Depending on the size of your data, truncating and reloading can take a significant amount of time—we’ve seen cases where reloading all the affected tables would take two weeks. Fortunately, inserting directly into your temporal table allows you to avoid the lengthy truncate and reload process.
Before you start inserting data, there are a couple of preliminary steps we recommend. To help simplify the process, isolate the data you need to insert by getting it into a physical staging table—we refer to this as a corrections table. Similar to removing data, you’ll also need to turn the system versioning off.
Once you have a corrections table and versioning is off, the first step is to check for any records in the current table that will need to be pushed to history. These are records that would have been updated by the data you’re inserting. Here are example queries to identify those records, delete them from the current table, and insert them into the history table. In addition to the physical corrections table, we also used a temporary staging table to help with moving data back and forth.
CREATE TABLE #Staging ( [CustomerID] INT NOT NULL ,[FirstName] VARCHAR(40) ,[LastName] VARCHAR(40) ,[Address] VARCHAR(120) ,[RowStart] DATETIME2 ,[RowEnd] DATETIME2 );
INSERT INTO #Staging SELECT c.* FROM dbo.Customer c JOIN dbo.Customer_Corrections i ON c.CustomerID = i.CustomerID WHERE c.RowStart < i.RowStart;
DELETE FROM dbo.Customer WHERE EXISTS (SELECT * FROM #Staging WHERE dbo.Customer.CustomerID = #Staging.CustomerID);
INSERT INTO dbo.Customer_History SELECT * FROM #Staging;
After moving the appropriate records to history, the next step is to insert data that is now the current version of those records into the current table.
INSERT INTO dbo.Customer SELECT i.* FROM dbo.Customer_Corrections i JOIN #Staging s ON i.CustomerID = s.CustomerID WHERE i.RowStart > s.RowStart
The third step is to insert the rest of the data into the history table. To avoid mistakes, we first deleted data from our corrections table that we had already inserted into the current table, which allowed us to insert all remaining records into history.
DELETE i FROM dbo.Customer_Corrections i JOIN dbo.Customer c ON i.CustomerID = c.CustomerID AND i.RowStart = c.RowStart;
INSERT INTO dbo.Customer_History SELECT * FROM dbo.Customer_Corrections;
The last step in this process is to correct the row start and row end values, which will now be out of sequence because of the data inserted. You can use the same query shown above in the ‘Making Historical Records Active’ section to update the row start and end. Be mindful that if your inserts cause your row start and end values to overlap, you will not be able to turn system versioning back on without completing this step.
At this point, the missing records will be inserted into either the current or history table. You can use the same query shown earlier to turn versioning back on.
Considerations
Now that we’ve demonstrated how to bypass the constraints of temporal tables, here are three best practices for making these changes.
1. Define a Process
Before you start making changes to your temporal tables, make sure you’ve established a clear process that has buy-in from your organization. For our team, this process included:
Analysis to determine data correction requirements and explore options
Script development and testing
Initial code review with the development team
Feedback and additional testing
Final code review
Script execution
Document changes
2. Create an Audit Trail
Temporal tables provide a built-in auditing mechanism, but once you turn the system versioning off and make changes, you’ve altered your audit trail. We recommend documenting the changes you’ve made and storing the scripts you used. For example, creating a spreadsheet in a shared drive is a quick and reliable way to keep track of data corrections.
If there’s a question about data accuracy later on, having a record of the changes you made will provide clarity. Additionally, depending on your industry, recording these changes may be a necessary step to stay in compliance.
3. Work in a Test Environment
Altering the history of your data in a test environment will have a much lower impact and lower risk than doing so in production. With that in mind, we would not recommend making these changes directly in a production environment. Our team used the methods described above to alter data in a test environment, which then went through rigorous validation before being pushed to production.
Even when working in a test environment, it’s a great idea to have safety nets in place when you’re altering data. Here are a few suggestions to consider:
Set up point-in-time backups of your database:
Backups can be daily, hourly, or every few minutes.
Be careful about user privileges:
Know who on your team is able to delete and insert data and ensure they are cautious when making changes.
Set up indicators for different environments:
Avoid the pain of accidentally deleting something in test that you meant to try out in dev by setting up a visual indicator to remind yourself which environment you’re in.
For example, in SQL Server Management Studio, you can change the color of the status bar to red for anything other than your sandbox database.
Use transactions when updating historical data:
Run your DML statements inside a transaction, which will allow you to roll back your changes in case of a mistake.
Note that you cannot turn the system versioning on and off inside a transaction.
Conclusion
Temporal tables are a great tool for tracking historical changes and providing point-in-time reporting for your organization. In cases where you need to have an audit mechanism or where you’re using slowly changing dimensions, temporal tables are particularly useful. Making data corrections to temporal tables is more complex than regular tables but using best practices can help you when historical changes are needed to advance your organization’s data quality efforts. In our next blog post, we’ll discuss long-term considerations for using temporal tables in your data architecture.
If you’re interested in implementing temporal tables in your data platform, we’d love to help! Feel free to reach out to us at marketing@credera.com.

Blog
Oct 29, 2019
Temporal Table Series Part 1: Introduction to Temporal Tables in SQL Server
Data quality and accuracy are foundational to a winning data strategy, and design choices for your organization’s data...


Blog
Jun 11, 2020
Temporal Table Series Part 3: Integrating Into Existing Data Architecture
Data architecture decisions can feel like an activity solely in the realm of IT, but architecture choices ultimately impact...

Contact Us
Let's talk!
We're ready to help turn your biggest challenges into your biggest advantages.
Searching for a new career?
View job openings